Introduction
Smart homes are no longer a futuristic concept; they are becoming an essential part of modern living. With technology advancing rapidly, homeowners now have the tools to automate, monitor, and control almost every aspect of their home. From lighting and security to entertainment and energy management, smart home devices make life more convenient, efficient, and secure.
For beginners and intermediate DIY enthusiasts, smart home projects offer a fun and practical way to learn technology while improving your home. The good news is that you don’t need to be an expert engineer to get started. With the right guidance, simple tools, and a bit of creativity, you can transform your ordinary home into a connected smart home.
In this article, we will explore smart home DIY projects in detail. We’ll cover what a smart home is, why it is important, and provide step-by-step project ideas suitable for beginners. Along the way, we’ll highlight benefits, potential risks, common mistakes, and expert tips to make your smart home journey smooth and rewarding. Whether you’re looking to save energy, increase security, or simply enjoy the convenience of automation, this guide has you covered. By the end, you will feel confident in creating a smarter, more efficient, and more comfortable home.
What is Smart Home DIY Projects?
Smart home DIY projects refer to personal initiatives to install, set up, and integrate smart devices within a home. Unlike buying pre-installed systems or hiring professionals, DIY projects empower you to create a connected home yourself.
At its core, a smart home uses devices that can communicate with each other and the user, often through apps, voice assistants, or automation systems. Examples include smart bulbs, thermostats, door locks, cameras, sensors, and voice-controlled speakers. By linking these devices, you can automate tasks such as adjusting the thermostat, turning off lights when you leave the room, or monitoring your security system remotely.
The “DIY” aspect emphasizes the homeowner’s involvement in selecting devices, installing them, and creating automation routines. Not only does this approach save money, but it also allows personalization. You can design your smart home exactly the way you want, creating unique routines that suit your lifestyle.
Some common tools and technologies used in smart home DIY projects include:
- Wi-Fi and Bluetooth-enabled devices
- Smart hubs like Amazon Echo, Google Home, or Apple HomePod
- Mobile apps for automation and control
- Sensors for motion, temperature, and humidity
- Basic wiring tools for lighting and power integration
With these tools, even beginners can start automating daily tasks, making their homes safer, energy-efficient, and more comfortable.
Why is Smart Home DIY Projects Important?
Smart home DIY projects are becoming increasingly important for several reasons. Here’s why homeowners should consider investing time and effort in them:
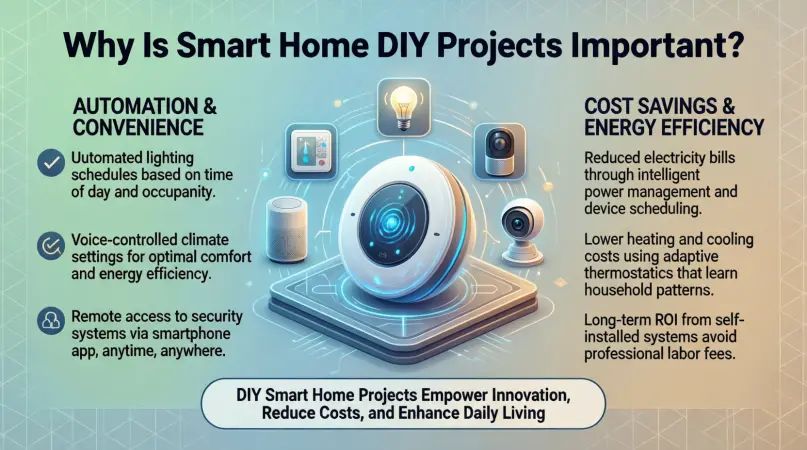
- Convenience: Smart devices allow you to control multiple aspects of your home from a single app or voice command. For instance, you can adjust the thermostat, switch off lights, or start your coffee machine without leaving your couch.
- Energy Efficiency: By automating lighting, heating, and cooling, smart devices help reduce energy wastage. Sensors can turn off appliances when not in use, lowering electricity bills.
- Security: DIY smart home security systems, including cameras, door sensors, and alarms, provide real-time monitoring. You can receive alerts for unusual activity and even watch live footage from anywhere in the world.
- Cost Savings: Installing smart home devices yourself eliminates professional installation fees. Additionally, energy-efficient automation reduces monthly utility costs.
- Customization: DIY projects allow you to create a home tailored to your needs. You can design automation routines, set schedules, and choose devices that suit your lifestyle and budget.
- Learning Opportunity: Working on smart home projects teaches you valuable skills, from basic electronics and coding to understanding wireless communication and networking.
- Future-Proofing: As technology evolves, having a smart home foundation makes it easier to integrate future devices and upgrades.
By undertaking smart home DIY projects, you not only modernize your home but also make it more functional, secure, and enjoyable for everyday living.
Detailed Step-by-Step Guide
Step 1: Planning Your Smart Home
Before buying devices, it’s essential to plan. Ask yourself:
- What areas of my home do I want to automate?
- Which devices are essential, and which are optional?
- What is my budget for the project?
- Do I prefer voice control, app-based control, or both?
Tip: Start small. Focus on one room or function first, such as smart lighting in the living room. You can expand gradually.
Step 2: Choosing Smart Devices
Selecting the right devices is critical. Some popular options include:
- Smart Lights: Philips Hue, LIFX, or budget-friendly bulbs
- Smart Plugs: TP-Link Kasa, Wemo, or Gosund
- Thermostats: Nest, Ecobee, or Honeywell
- Security Cameras: Ring, Arlo, or Wyze
- Sensors: Motion, temperature, or door/window sensors
- Voice Assistants: Amazon Alexa, Google Assistant, or Apple Siri
Tip: Ensure devices are compatible with your chosen smart hub or app.
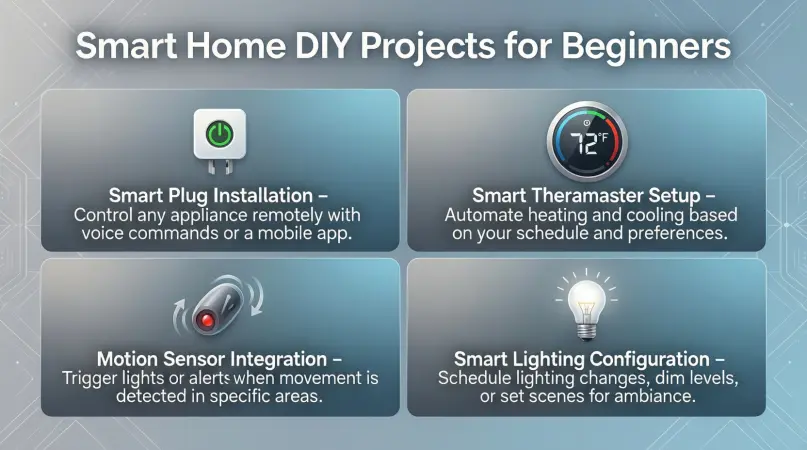
Step 3: Installing Smart Lighting
DIY Smart Light Project:
- Turn off the main power supply.
- Remove your existing bulb and replace it with a smart bulb.
- Connect the bulb to your Wi-Fi network using the manufacturer’s app.
- Create automation routines, such as turning lights on at sunset or off when no motion is detected.
Pro Tip: Use dimmable smart bulbs for added ambiance control.
Step 4: Setting Up Smart Plugs
DIY Smart Plug Project:
- Plug a smart plug into any wall socket.
- Connect the plug to the mobile app or smart hub.
- Plug appliances into the smart plug.
- Set schedules or remote control to turn devices on/off automatically.
Example: Automate your coffee machine to start every morning at 7 AM.
Step 5: Installing a Smart Thermostat
DIY Smart Thermostat Project:
- Turn off the power to your HVAC system.
- Remove the old thermostat and label wires.
- Install the smart thermostat following the instructions.
- Connect it to Wi-Fi and set temperature schedules.
- Use geofencing to adjust temperature when you leave or arrive home.
Benefit: Saves energy by only heating or cooling your home when needed.
Step 6: Setting Up Smart Security Cameras
DIY Security Camera Project:
- Choose strategic locations such as entry points or the backyard.
- Mount cameras according to the manual.
- Connect to Wi-Fi and create alerts in the app.
- Test motion detection and live streaming.
Tip: Combine cameras with door/window sensors for full coverage.
Step 7: Automating with Smart Hubs
Creating Automation:
- Connect all smart devices to a compatible hub.
- Use routines like:
- “Good Morning” turns on lights and starts coffee machine.
- “Away Mode” turns off lights, adjusts thermostat, and enables security alerts.
- Test routines to ensure they work smoothly.
Example: A single voice command can trigger multiple actions at once.
Step 8: Expanding Your Smart Home
After mastering basic projects, consider:
- Smart blinds and curtains
- Water leak sensors
- Smart door locks
- Multi-room smart speakers
- Home entertainment automation
Gradual expansion keeps your home manageable and prevents overwhelm.
Benefits of Smart Home DIY Projects
- Increased convenience and comfort
- Energy savings through automation
- Enhanced home security
- Cost-effective compared to professional installation
- Customizable to personal preferences
- Fun and educational learning experience
- Remote control of home devices from anywhere
- Future-proof technology integration
Disadvantages / Risks
- Initial cost of smart devices
- Complexity in setup for beginners
- Compatibility issues between devices
- Security risks if devices are not properly secured
- Dependence on Wi-Fi connectivity
- Regular software updates required
Common Mistakes to Avoid
- Buying incompatible devices
- Skipping proper planning and layout
- Overloading Wi-Fi with too many devices
- Neglecting security settings (default passwords)
- Rushing installation without reading manuals
- Ignoring energy-saving features
- Not testing automation routines thoroughly
FAQs
1. Do I need to be tech-savvy for smart home DIY projects?
No. Many smart devices are beginner-friendly and come with detailed manuals and apps. Start with basic projects and gradually expand.
2. Can smart home devices work without Wi-Fi?
Some devices, like Bluetooth lights or hubs with local control, can function without Wi-Fi. However, most devices rely on Wi-Fi for full automation and remote access.
3. Are smart home devices secure?
Yes, if you follow best practices. Change default passwords, enable two-factor authentication, and update firmware regularly to reduce security risks.
4. How much does it cost to start a smart home?
Costs vary based on devices and scale. Beginners can start with $50–$200 for essential devices like smart bulbs, plugs, and a hub.
5. Can I integrate devices from different brands?
Yes, but check compatibility with your smart hub. Platforms like Alexa, Google Home, and Apple HomeKit support multiple brands.
6. Is DIY better than professional installation?
DIY is cost-effective and customizable, but professionals can save time for complex systems. Beginners should start small and expand gradually.
7. How do I troubleshoot smart home devices?
Common steps include rebooting the device, checking Wi-Fi, updating the app, or resetting the device to factory settings.
8. Can smart home projects increase property value?
Yes. Smart home features are attractive to buyers as they offer convenience, security, and energy efficiency.
Expert Tips & Bonus Points
- Start Small: Begin with lighting or plugs before tackling security or thermostats.
- Check Compatibility: Ensure devices work with your hub or app before purchasing.
- Secure Your Network: Use strong passwords, change default credentials, and enable encryption.
- Label Devices: Keep track of devices and automation routines for easy management.
- Use Scenes & Routines: Combine multiple actions with a single command for efficiency.
- Regular Maintenance: Update firmware and clean sensors for optimal performance.
- Experiment Safely: Try new devices on a single outlet or room before full integration.
- Document Automation: Keep notes on schedules and routines to replicate them in the future.
Bonus Tip: Consider energy-monitoring plugs to see which devices consume the most power, helping you save money and reduce your carbon footprint.
Conclusion
Smart home DIY projects offer a remarkable opportunity to upgrade your living space while learning new skills. They bring convenience, efficiency, and security into your daily life and allow for a high level of personalization. From smart lighting and plugs to thermostats and security systems, beginners can start with simple projects and gradually expand their home automation setup.
By planning carefully, choosing compatible devices, and following step-by-step guides, anyone can create a smart home without breaking the bank. While there are some risks and common mistakes, these can be easily avoided with proper research and precautions.