Introduction
Learning electronics can be an exciting journey, especially for beginners. It opens up a world where imagination meets technology, allowing you to build devices, understand circuits, and even create smart gadgets. However, getting started can feel intimidating. With so many components, tools, and concepts, it’s easy to feel lost. That’s why beginner electronics projects are essential—they provide a hands-on approach to learning while making the process enjoyable and practical.
These projects don’t require advanced knowledge. They are designed to teach the basics of circuits, resistors, LEDs, sensors, and microcontrollers in a simple, easy-to-understand way. By engaging with these projects, you can strengthen your problem-solving skills, develop creativity, and gain confidence in electronics. Whether you’re a student, hobbyist, or just curious about technology, starting with beginner electronics projects is the best way to grow.
This guide covers everything from understanding electronics to step-by-step project instructions, their benefits, common mistakes to avoid, and expert tips. After reading, you will have a clear roadmap to start your electronics journey confidently.
What is Beginner Electronics Projects?
Beginner electronics projects are simple, hands-on activities designed to help learners understand the fundamentals of electronics. These projects usually involve basic components such as LEDs, resistors, batteries, switches, and microcontrollers like Arduino or Raspberry Pi. The main goal is to teach how circuits work and how components interact to produce a desired outcome.
These projects range from creating a blinking LED to building small robots or automatic devices. The complexity is minimal, but the learning is significant. By practicing these projects, beginners learn to read circuit diagrams, use breadboards, solder components, and even program basic microcontrollers.
In short, beginner electronics projects are the first step toward mastering electronics, combining practical experience with theoretical understanding.
Why is Beginner Electronics Projects Important?
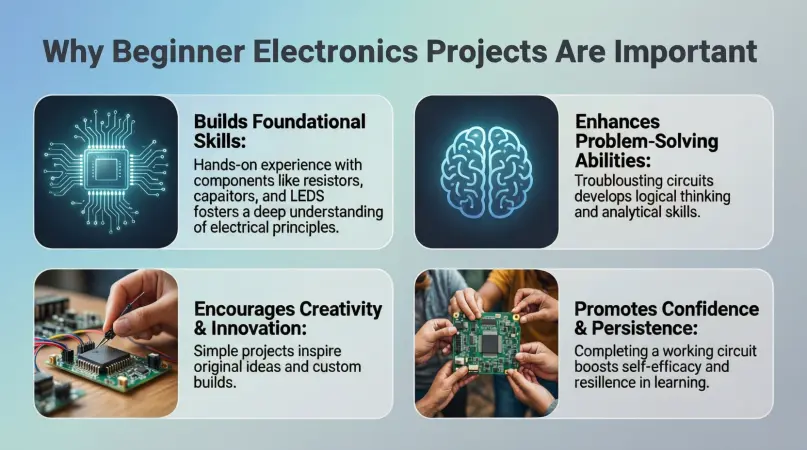
Starting with beginner electronics projects is important for several reasons:
- Hands-On Learning: Theoretical knowledge is important, but practical projects allow learners to see how components interact.
- Boost Creativity: Projects encourage problem-solving and innovative thinking.
- Foundation for Advanced Skills: Early projects lay the groundwork for complex electronics, robotics, and IoT applications.
- Confidence Building: Completing a project successfully gives a sense of achievement and motivates further learning.
- Career Opportunities: For students, experience with electronics projects can open doors to careers in engineering, technology, and programming.
By practicing these projects, beginners gain practical skills and a better understanding of how electronics are applied in everyday devices, making learning both useful and fun.
Detailed Step-by-Step Guide
Here’s a detailed guide for several beginner electronics projects that are easy to follow and highly educational.
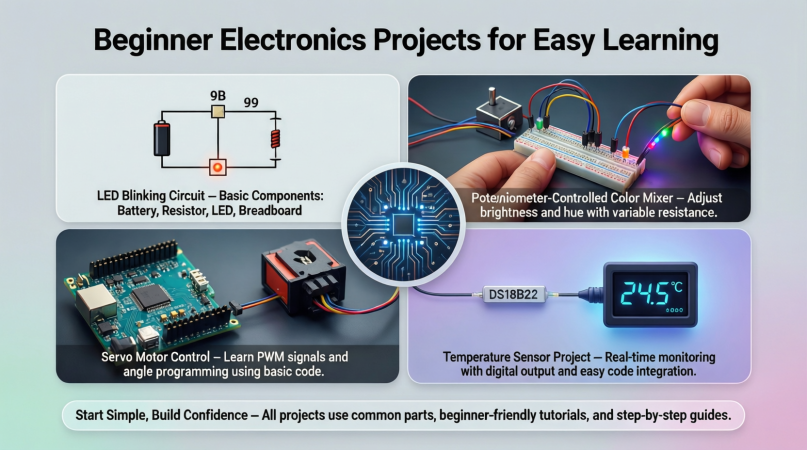
1. Blinking LED Project
Objective: Learn basic circuitry using an LED, resistor, and battery.
Materials Needed:
- 1 LED (any color)
- 1 220-ohm resistor
- 1 9V battery and connector
- Breadboard
- Jumper wires
Steps:
- Place the LED on the breadboard. The longer leg is positive (anode), the shorter leg is negative (cathode).
- Connect the resistor to the cathode leg.
- Connect a jumper wire from the resistor to the negative terminal of the battery.
- Connect another jumper wire from the anode to the positive terminal.
- Watch the LED light up!
Learning Outcome: Understand polarity, resistance, and basic circuit connections.
2. Simple Buzzer Alarm
Objective: Learn about buzzers and switches.
Materials Needed:
- 1 buzzer
- 1 push-button switch
- 1 9V battery
- Jumper wires
Steps:
- Connect one wire of the buzzer to the positive battery terminal.
- Connect the other wire to one terminal of the switch.
- Connect the remaining terminal of the switch to the negative battery terminal.
- Press the button to activate the buzzer.
Learning Outcome: Learn about switches, electrical flow, and basic alarms.
3. Light-Activated LED
Objective: Use a photoresistor to control LED lights.
Materials Needed:
- 1 LED
- 1 photoresistor (LDR)
- 1 220-ohm resistor
- 9V battery
- Breadboard & jumper wires
Steps:
- Connect the LED in series with a resistor to the positive terminal.
- Connect the negative leg of the LED to the negative terminal via the LDR.
- Expose the LDR to light and darkness to see the LED respond.
Learning Outcome: Understand sensors and light-dependent control.
4. Simple Temperature Sensor Circuit
Objective: Learn how sensors work to detect temperature.
Materials Needed:
- 1 thermistor
- 1 LED
- 1 220-ohm resistor
- 9V battery
- Breadboard & wires
Steps:
- Connect the thermistor in series with a resistor and LED.
- Connect the circuit to the battery.
- Heat the thermistor (carefully) and observe changes in LED brightness.
Learning Outcome: Learn about temperature sensors and analog circuits.
5. Water Level Indicator
Objective: Create a simple water level indicator using conductive probes.
Materials Needed:
- 3 LEDs (green, yellow, red)
- 3 resistors (220 ohms)
- 9V battery
- 3 water probes or metal strips
Steps:
- Connect each LED with a resistor in parallel circuits.
- Connect each probe to the LED circuits.
- Insert the probes at different water levels. LEDs light up as water reaches each probe.
Learning Outcome: Learn about conductivity, parallel circuits, and practical applications.
6. Mini Fan Controlled by Switch
Objective: Learn motor control in electronics.
Materials Needed:
- Small DC motor
- 1 switch
- 9V battery
- Breadboard & wires
Steps:
- Connect the motor terminals to the switch.
- Connect the switch to the battery.
- Turn the switch ON/OFF to control the motor.
Learning Outcome: Understand motors, power control, and switches.
7. Traffic Light Simulation
Objective: Simulate traffic lights using LEDs.
Materials Needed:
- 1 red, 1 yellow, 1 green LED
- 3 resistors (220 ohms)
- Arduino board (optional)
- Breadboard & wires
Steps:
- Connect LEDs to Arduino or breadboard circuits with resistors.
- Program the Arduino (or manually switch) to light LEDs in sequence: red → yellow → green.
Learning Outcome: Learn about sequencing, programming, and LED control.
8. Clap Switch Project
Objective: Control a device using sound (clap).
Materials Needed:
- Sound sensor module
- Relay module
- LED or small appliance
- Arduino board
- Jumper wires
Steps:
- Connect the sound sensor to the Arduino.
- Connect the relay module to control the LED or appliance.
- Program the Arduino to turn the device ON/OFF when sound is detected.
Learning Outcome: Learn about sound sensors, programming, and automation.
9. Simple Solar Tracker
Objective: Make a mini solar tracker to follow light.
Materials Needed:
- 2 photoresistors
- Small servo motor
- Arduino board
- Solar panel or light source
Steps:
- Place the photoresistors on opposite sides of the panel.
- Connect them to Arduino analog pins.
- Program Arduino to move the servo toward the brighter light.
Learning Outcome: Learn about analog input, servo control, and renewable energy applications.
Benefits of Beginner Electronics Projects
- Hands-on learning experience
- Improves problem-solving skills
- Boosts creativity and innovation
- Provides a strong foundation for advanced electronics
- Encourages independent learning
- Makes learning fun and engaging
- Prepares for STEM careers
- Improves understanding of everyday devices
Disadvantages / Risks
- Short-circuiting components if connected incorrectly
- Risk of minor electric shocks with higher voltages
- Components can burn if overheated
- Mistakes in programming microcontrollers may frustrate beginners
- Requires patience and precision
Common Mistakes to Avoid
- Ignoring polarity of LEDs and components
- Using incorrect resistor values
- Not checking connections before powering circuits
- Overloading components with too much voltage
- Skipping reading the datasheet of sensors or ICs
- Not testing each section of a project incrementally
FAQs
1. Do I need an Arduino to start electronics projects?
No. While Arduino simplifies programming and advanced projects, many beginner projects like LED circuits, buzzers, and switches can be done without microcontrollers.
2. What tools do I need for beginner electronics?
Basic tools include a breadboard, jumper wires, multimeter, resistors, LEDs, switches, and a small power source. Soldering kits are optional for permanent projects.
3. How can I avoid burning components?
Always check voltage ratings, use appropriate resistors, and connect components properly. Start with low-voltage projects for safety.
4. Are these projects expensive?
Not at all. Most beginner projects use affordable components that can be reused in multiple projects. A basic starter kit costs around $20–$50.
5. Can I learn programming with electronics?
Yes. Projects involving Arduino, Raspberry Pi, or microcontrollers teach basic programming while controlling circuits and sensors.
6. How long does it take to complete a project?
Simple projects like a blinking LED take minutes. More advanced projects like a mini solar tracker may take several hours, including programming and testing.
7. Can I make my projects portable?
Yes. Using battery packs or small rechargeable batteries makes projects portable and practical.
8. How do I troubleshoot a project if it doesn’t work?
Check connections, polarity, resistor values, and ensure components are functional. Test each section individually to identify errors.
Expert Tips & Bonus Points
- Always start small: Begin with simple LED and switch projects before moving to sensors and motors.
- Label components: Helps in understanding and prevents confusion.
- Document your work: Keep notes on connections, code, and outcomes for future reference.
- Reuse components: Many beginner kits have reusable components to save cost.
- Experiment: Modify circuits and see how results change. Learning comes from trial and error.
- Safety first: Always disconnect power before making changes.
- Use online simulators: Tools like Tinkercad Circuits allow you to test projects virtually before building physically.
- Learn to read datasheets: It helps in understanding components and prevents damage.
Conclusion
Beginner electronics projects are an excellent way to enter the world of technology. They provide practical experience, boost creativity, and teach essential skills for advanced electronics and programming. Starting with simple projects like blinking LEDs, buzzer alarms, or light sensors builds confidence and lays a strong foundation.
These projects are not only educational but also enjoyable. They encourage experimentation, problem-solving, and innovation. By avoiding common mistakes, following safety guidelines, and applying expert tips, beginners can make consistent progress and eventually tackle complex electronics challenges.