Introduction
Arduino DIY projects have become one of the most popular ways for beginners and intermediate electronics enthusiasts to explore technology creatively. With Arduino boards, sensors, and simple coding, anyone can build exciting gadgets, automated systems, and smart home solutions. These projects are not only educational but also fun, encouraging you to experiment and learn hands-on electronics.
Whether you want to make a small robot, a weather station, or a smart plant watering system, Arduino makes it possible. Its user-friendly platform, affordable hardware, and large community support make it an excellent starting point for DIY electronics. In this guide, we will cover everything from understanding Arduino, its importance, and step-by-step project ideas to benefits, risks, common mistakes, expert tips, and FAQs. By the end, you will have a clear roadmap to start your Arduino DIY journey with confidence.
This article is designed for beginners and intermediate hobbyists. Even if you have no prior experience in electronics, the explanations are simple, engaging, and practical. By following these projects, you’ll gain real-world skills in coding, circuit design, and problem-solving. The goal is to make Arduino DIY projects accessible and enjoyable for everyone.
What is Arduino?
Arduino is an open-source electronics platform that combines hardware and software to create interactive devices. It consists of a microcontroller board that can be programmed to read inputs (like sensors) and control outputs (like LEDs, motors, or displays).
Arduino boards are widely used because they are:
- Affordable: Low-cost boards make experimenting easy.
- Easy to Program: Arduino IDE provides a beginner-friendly environment.
- Flexible: Compatible with a wide range of sensors and modules.
- Supported by Community: Tutorials, forums, and project ideas are widely available.
The most common Arduino boards include Arduino Uno, Nano, and Mega. Each has different features, but all allow you to design projects ranging from simple blinking LEDs to complex automation systems. Arduino is not just a tool—it’s a gateway to learning electronics, coding, and problem-solving in a fun, creative way.
Why is Arduino DIY Projects Important?
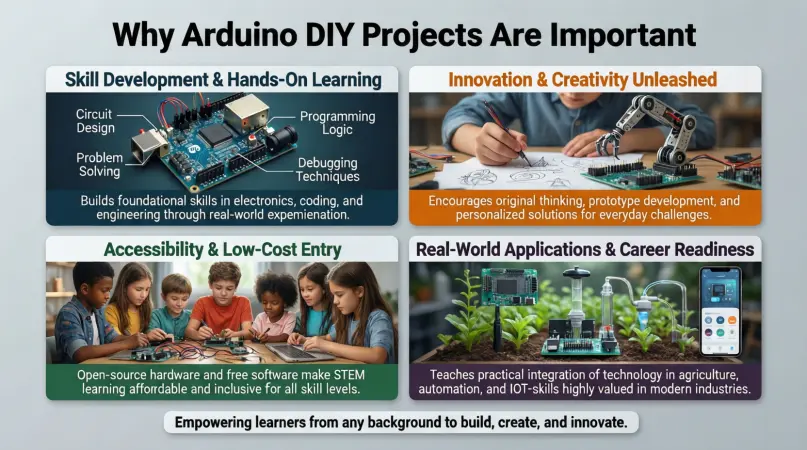
Arduino DIY projects offer several educational and practical benefits:
- Hands-on Learning: You learn electronics and programming by doing, not just reading.
- Creativity: Encourages innovative thinking and problem-solving.
- Career Skill Development: Knowledge of Arduino and electronics is valuable in tech fields.
- Affordable Prototyping: Quickly build and test ideas without expensive equipment.
- Community Support: Beginners can get guidance from a global Arduino community.
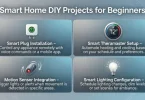
Additionally, Arduino projects can solve real-world problems. For example, a DIY home automation system can control lights, temperature, or irrigation, reducing energy costs and improving convenience. With Arduino, learning becomes interactive and practical, rather than theoretical.
Detailed Step-by-Step Guide
1. Getting Started with Arduino
Before diving into projects, you need the right setup:
Materials Needed:
- Arduino board (Uno recommended for beginners)
- USB cable
- Breadboard
- Jumper wires
- LEDs, resistors, and sensors
- Arduino IDE installed on your computer
Step-by-Step Setup:
- Connect Arduino to your computer via USB.
- Open Arduino IDE and select your board and port.
- Load a sample sketch, like “Blink,” to test the setup.
- Observe the onboard LED blinking – your Arduino is ready.
2. Project 1: LED Blinking Tutorial
Objective: Learn basic coding and circuit setup.
Steps:
- Insert an LED into the breadboard.
- Connect the long leg to pin 13 on Arduino and the short leg to GND via a resistor.
- Write the following code in Arduino IDE:
void setup() { pinMode(13, OUTPUT); } void loop() { digitalWrite(13, HIGH); delay(1000); digitalWrite(13, LOW); delay(1000); } - Upload the code and watch the LED blink.
3. Project 2: Automatic Plant Watering System
Objective: Combine sensors and outputs for automation.
Materials Needed:
- Soil moisture sensor
- Water pump
- Relay module
- Arduino Uno
Steps:
- Connect the sensor to Arduino analog input.
- Connect the relay and pump to control water flow.
- Write code to check soil moisture and activate the pump if soil is dry.
Result: Your plants get watered automatically, saving time and preventing overwatering.
4. Project 3: Temperature Monitoring System
Objective: Monitor temperature using sensors.
Materials Needed:
- DHT11/DHT22 sensor
- Arduino Uno
- LCD display
Steps:
- Connect the sensor to Arduino digital pins.
- Connect the LCD for real-time display.
- Write code to read sensor values and display temperature.
Outcome: You can monitor room temperature continuously and even trigger alerts if thresholds are exceeded.
5. Project 4: Simple Arduino Robot
Objective: Introduce robotics using Arduino.
Materials Needed:
- DC motors and motor driver
- Chassis and wheels
- Arduino Uno
- Ultrasonic sensor
Steps:
- Connect motors to motor driver and Arduino.
- Attach ultrasonic sensor for obstacle detection.
- Write code to move the robot forward and stop when it detects an obstacle.
Outcome: Your robot can navigate simple obstacles, offering hands-on experience in robotics programming.
Benefits of Arduino DIY Projects
- Learning by Doing: Develop practical electronics and coding skills.
- Problem-Solving Skills: Tackle real-world challenges creatively.
- Cost-Effective: Affordable kits allow experimentation without heavy investment.
- Flexibility: Projects can range from simple to complex.
- Community Support: Access tutorials, forums, and collaborative learning.
- Innovation: Encourage creating unique gadgets and automation systems.
Disadvantages / Risks
- Initial Learning Curve: Beginners may find coding and circuits tricky.
- Component Damage: Incorrect connections can burn sensors or boards.
- Time-Consuming: Some projects require patience and troubleshooting.
- Limited Processing Power: Arduino cannot handle very complex tasks like AI or advanced graphics.
- Power Supply Limitations: Some projects need additional power sources.
Common Mistakes to Avoid
- Ignoring Datasheets: Always check pin configurations and voltage limits.
- Wrong Wiring: Double-check connections before powering up.
- Overloading Pins: Do not connect high-current devices directly to Arduino pins.
- Skipping Code Testing: Upload small parts of code first to debug effectively.
- Neglecting Safety: Handle electrical components carefully to prevent damage.
- Lack of Documentation: Keep notes of connections and code for easier troubleshooting.
FAQs
1. Do I need prior programming knowledge for Arduino projects?
No. Arduino IDE uses simple C++-based syntax. Beginners can start with basic examples like LED blinking and gradually advance to complex projects.
2. Which Arduino board is best for beginners?
Arduino Uno is ideal due to its simplicity, affordability, and large community support. Nano and Mega are also good but suited for specific projects.
3. Can I connect Arduino to the internet?
Yes. Using Wi-Fi modules like ESP8266 or Ethernet shields, Arduino can send and receive data online for IoT projects.
4. How much does it cost to start Arduino DIY projects?
Starter kits cost around $20–$50 and include the Arduino board, sensors, LEDs, motors, and jumper wires.
5. Are Arduino projects suitable for kids?
Yes. With supervision, children can learn electronics, coding, and creativity through simple projects. Kits often come with beginner-friendly tutorials.
6. Can Arduino be used for home automation?
Absolutely. Arduino can control lights, fans, temperature, irrigation systems, and more. Adding relays and sensors enables smart home applications.
7. How do I troubleshoot if my project doesn’t work?
- Check wiring and connections.
- Test individual components.
- Use serial monitor for debugging code.
- Consult Arduino community forums for guidance.
8. Are Arduino projects scalable?
Yes. Start small, then integrate multiple sensors, motors, or IoT features to build advanced projects.
Expert Tips & Bonus Points
- Start Simple: Begin with LED projects before moving to sensors and robotics.
- Use Breadboards: Avoid soldering initially; breadboards allow easy modifications.
- Keep Components Organized: Label wires and components to save time.
- Use Serial Monitor: Debugging via Arduino IDE helps track sensor outputs.
- Document Your Work: Maintain notes and photos for reference.
- Explore Libraries: Arduino has ready-made libraries for sensors, motors, and displays.
- Safety First: Always check voltage ratings and avoid short circuits.
- Learn by Experimenting: Modify sample codes to see how changes affect the project.
Bonus Projects:
- Motion-sensing alarm system
- Smart weather station
- Automated pet feeder
- Bluetooth-controlled car
- LED matrix display with animations
Conclusion
Arduino DIY projects offer an incredible opportunity to learn electronics, coding, and problem-solving in a practical, engaging way. Whether you are a beginner or an intermediate hobbyist, Arduino provides tools to build everything from simple LED circuits to smart robots and home automation systems. The platform’s affordability, flexibility, and strong community support make it accessible to everyone, encouraging experimentation and innovation.
By following step-by-step projects, avoiding common mistakes, and implementing expert tips, you can gain confidence and expand your skills quickly. Arduino projects not only enhance technical knowledge but also develop creativity, patience, and logical thinking.